This guide outlines the process of drawing a beach scene. It is intended for individuals with varying levels of artistic experience, from beginners to those seeking to refine their technique. A beach setting offers a broad palette of natural elements, allowing for diverse interpretations.
A successful beach drawing relies on accurately representing its constituent parts. These elements function in concert, much like the waves of the ocean shaping the coastline over time, to create a cohesive and believable image.
The Sand
Sand forms the primary canvas of the beach. Its texture, color, and how it interacts with light and shadow are crucial to consider.
Texture and Grain
The grain of sand is not uniform. While it may appear smooth from a distance, a closer examination reveals subtle variations in size and shape. To represent this, consider using a variety of line weights and pressures. For denser, more packed sand, closer and darker lines can suggest this compaction. For looser, drier sand, lighter, more broken lines can be employed. Think of it as the individual notes in a chord, seemingly distinct yet contributing to a harmonious whole.
Color Palette
Beach sand exhibits a range of colors, from pale cream and white to golden yellow, tan, and even reddish-brown. Observe reference images to determine the prevailing color of the sand you are depicting. Don’t be afraid to introduce subtle variations within the sand itself. A single patch of sand is rarely one flat color. Shadows cast by dunes, footprints, or scattered shells will introduce darker tones. Conversely, areas directly hit by sunlight will be lighter.
Form and Topography
Beaches are seldom perfectly flat. They often feature gentle slopes, undulating dunes, and subtle depressions. These topographical features influence how light falls upon the sand, creating highlights and shadows. Observe how the crests of small dunes catch the light, appearing brighter, while the leeward slopes recede into shadow. This play of light and shadow gives the sand form and dimensionality, preventing it from appearing as a flat plane.
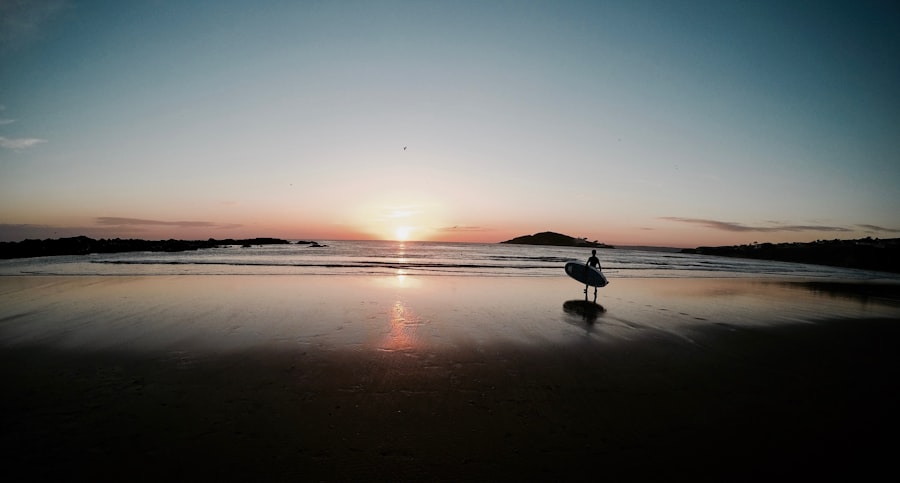
The Water
The ocean is a dynamic and multifaceted element of a beach scene. Its appearance is dictated by factors such as light, wind, and depth.
Waves
Waves are the most characteristic movement of the ocean. Their form varies considerably. Gentle ripples approaching the shore will have soft, rounded crests. Larger waves may feature more defined, breaking crests that curl and foam. When drawing waves, consider the direction of the light source. The sunlit crests will appear luminous, while the shadowed troughs will be darker. The interaction of a breaking wave with the sand can create a foamy edge, a delicate lace against the shore.
Water Color
The color of the ocean is not a static blue. It can range from pale aquamarine in shallow, clear waters to deep indigo in the open sea. Factors such as sand particles suspended in the water, the color of the seabed, and atmospheric conditions all influence its hue. Reflections of the sky or surrounding elements can also tint the water. Imagine looking through a tinted lens; the color you perceive is not inherent but a combination of the lens and what it views.
Surface Texture
The surface of the water can be smooth and glassy on a calm day, reflecting the sky like a mirror. On a windy day, it will be animated by ripples and chop, breaking up reflections and creating a dappled effect. The texture of the water’s surface can be suggested through varied brushstrokes or line work. Short, choppy lines can represent ripples, while smoother, more blended areas can indicate calmer water.
The Sky
The sky provides context and atmosphere for the beach. Its appearance changes throughout the day and is a significant determinant of the overall mood of the drawing.
Cloud Formations
Clouds are not just white puffs against the blue. They possess volume and texture. Cumulus clouds, for example, have rounded tops and flat bases, suggesting upward growth. Stratus clouds are often thin and wispy, resembling brushed strokes. The way light interacts with clouds is also important. Sunlight streaming through gaps in clouds can create dramatic shafts of light, known as crepuscular rays.
Color and Light
The sky’s color is incredibly variable. At midday, it is often a bright, clear blue. During sunrise and sunset, it transforms into a spectacle of oranges, pinks, reds, and purples as sunlight filters through a thicker layer of atmosphere. The quality of light – harsh and direct, or soft and diffused – significantly impacts the entire scene. Harsh sunlight creates strong contrasts and sharp shadows, while diffused light leads to softer transitions and a more subdued palette.
Horizon Line
The horizon line is the meeting point of the sky and the sea. Its placement within the composition is critical. A low horizon line emphasizes the vastness of the sky, while a high horizon line draws attention to the expanse of the beach and water. This line acts as an anchor for the viewer’s gaze.
Vegetation and Natural Features
While sand and water are primary, other elements can enrich a beach drawing.
Dunes
Dunes are organic mounds of sand shaped by wind. They often support sparse vegetation, which helps to stabilize them. Drawing dunes involves capturing their curved forms and the shadows they cast. The vegetation growing on them should be depicted with a sense of resilience, adapted to the harsh conditions.
Rocks and Cliffs
Some beaches are characterized by rocky outcrops or dramatic cliffs. These introduce strong geometric or organic forms into the scene, contrasting with the fluidity of the water and sand. The texture of rock is often rough and weathered, requiring different drawing techniques than sand. Erosion marks, mosses, and lichens can add detail and realism.
Shells and Debris
Scattered shells, driftwood, and other natural debris add points of interest and detail to the foreground or midground. They provide opportunities to introduce varied textures and colors. Consider the natural wear and tear on these objects; they are not pristine but bear the marks of their journey.
If you’re interested in enhancing your artistic skills beyond just drawing a beach, you might find the article on pasta delivery in Perth quite intriguing. It explores the vibrant culinary scene that can inspire your artwork with its rich colors and textures. You can read more about it here: Pasta Delivery in Perth. This could provide a delightful contrast to your beach drawings, blending the beauty of nature with the art of food.
Techniques for Drawing a Beach
Translating these elements into a visual representation requires specific artistic techniques. Think of these techniques as the tools in a craftsman’s toolkit, each suited for a particular task.
Composition and Perspective
The arrangement of elements within the drawing is as important as the elements themselves.
Establishing the Horizon Line
As mentioned, the horizon line is fundamental. Decide on its placement early in the process. This decision will influence the perceived scale and dominance of the sky versus the land and sea. For instance, placing the horizon line low will make the sky feel expansive, while a high horizon line will emphasize the foreground.
Creating Depth and Foreground, Middleground, and Background
To make your beach drawing feel three-dimensional, utilize techniques to create a sense of depth. The foreground, closest to the viewer, should contain the most detail and contrast. The middleground connects the foreground to the background, and the background, furthest away, should be less detailed and often lighter in tone to suggest atmospheric perspective. Objects in the foreground will appear larger and more sharply defined than those in the distance, much like how distant mountains appear hazy.
Rule of Thirds and Leading Lines
Consider compositional guidelines such as the rule of thirds, where key elements are placed at the intersections of lines that divide the image into nine equal parts. Leading lines, such as the curve of the shoreline or the path of receding waves, can guide the viewer’s eye through the drawing and into the scene.
Rendering Texture
Recreating the tactile quality of beach elements is paramount.
Drawing Sand Texture
As discussed, varying line weight and density is key. For finer sand, use lighter, more numerous lines. For coarser sand or areas with pebbles, use thicker lines and more varied shapes. Cross-hatching can be used to build up tone and suggest the uneven surface. Think of a tightly woven fabric versus a loosely spun yarn.
Depicting Water Effects
For water, different approaches are needed depending on whether you are drawing calm water, ripples, or breaking waves. Smooth, blended areas can represent still water. Short, broken strokes can suggest ripples. For the foam of breaking waves, consider using stippling or dabbing techniques to create a frothy effect. The spray from a wave might be suggested with very fine, dispersed lines.
Sky and Cloud Rendering
For the sky, smooth gradients are often used to depict a clear sky or subtle color shifts. For clouds, you can build volume through shading, using softer blending techniques. The edges of clouds can be softly defined or sharper, depending on the light and their density. The translucency of clouds can be suggested by allowing underlying sky colors to show through.
Utilizing Light and Shadow
Light and shadow are the sculptors of form in any drawing.
Identifying the Light Source
Before you begin, determine where the light is coming from – the sun. This will dictate where highlights and shadows fall. Imagine the sun as a spotlight on a stage, illuminating some areas and leaving others in darkness.
Creating Highlights
Highlights are the brightest points where light directly strikes the surface. These can be left as the white of the paper or carefully lifted with an eraser. They are crucial for conveying luminosity and realism.
Rendering Shadows
Shadows define form and create depth. They are not simply dark areas but have varying degrees of intensity. Cast shadows, those thrown by objects onto other surfaces, will have harder edges if the light is direct, and softer edges if the light is diffused. Form shadows, those on the object itself, will transition more gradually.
Step-by-Step Drawing Process

Here is a general approach to drawing a beach scene, broken down into manageable steps.
Pre-drawing Preparations
Before you put pencil to paper, take time to plan.
Gathering Reference Material
Collect photographs or sketches of beach scenes. Observe the details of the sand, water, sky, and any other elements. Pay attention to the light and shadow patterns. Having good references is like having a roadmap; it prevents you from getting lost.
Sketching a Basic Layout
Begin with a light sketch of the main elements. Focus on the placement of the horizon line, the general shapes of dunes or cliffs, and the outline of the water. Do not get bogged down in detail at this stage. This is the skeleton of your drawing.
Defining the Composition
Refine the initial sketch to establish a strong composition. Consider the rule of thirds and leading lines. Adjust the placement of elements to create visual interest and balance. This is like arranging the furniture in a room for optimal flow and aesthetics.
Rendering the Scene Layer by Layer
Build your drawing gradually, adding detail and tone.
Blocking in Major Shapes and Tones
Using a darker pencil or charcoal, lightly block in the darkest shadow areas and the general mid-tones of the scene. This helps to establish the overall value structure, much like laying down the base colors in a painting.
Developing the Sand
Focus on the sand. Layer in the variations in color and texture. Use your chosen techniques to depict the grain and the subtle topography. Pay attention to how the light falls on the sand and creates highlights and shadows.
Drawing the Water
Render the water, considering its color, movement, and surface texture. If waves are present, depict their form and the foam of breaking waves. For calmer water, focus on reflections and subtle color shifts.
Depicting the Sky and Clouds
Add the sky, paying attention to its color and the form of any clouds. Use smooth transitions for clear skies and build up volume for clouds through shading.
Adding Details and Finishing Touches
Once the major elements are in place, it’s time for refinement.
Incorporating Foreground Elements
Add details to the foreground, such as shells, seaweed, or footprints. These elements can add scale and realism to your drawing.
Refining Shadows and Highlights
Go back over your drawing and sharpen the contrasts. Ensure that shadows are deep enough and highlights are bright enough to give the scene form and dimension. This is like adjusting the focus on a camera for a crisp image.
Adding Atmospheric Effects
If desired, you can add subtle atmospheric effects. For a distant ocean, you might use lighter tones and softer edges to suggest haze. For a hot day, you could suggest shimmering heat waves with subtle wavy lines.
Common Challenges and Solutions
Even experienced artists encounter difficulties. Understanding these challenges can help you overcome them.
Flatness in the Sand
A common issue is sand appearing as a flat, uninteresting plane.
Solution: Emphasize Topography and Shadow Play
Actively look for subtle changes in elevation on the sand. Draw the small crests of ripples, depressions where water might have pooled, or the gentle slopes of dunes. Crucially, observe and render the shadows cast by these features. Even the smallest undulation will create a shadow if the light is strong enough. Think of a slightly crumpled sheet of paper; the folds and creases catch the light and create shadow, giving it form.
Unconvincing Water
Water can be challenging due to its translucency, reflectivity, and movement.
Solution: Observe Wave Structure and Light Interaction
Study how waves form and break. Pay attention to the curl of the crest, the white foam, and the way light passes through the translucent parts of the wave. For calmer water, focus on accurate reflections of the sky and surrounding objects. Distort reflections slightly to suggest movement, like a reflection in rippling water. The shimmer of sunlight on the water can be suggested with small, broken white lines or by leaving tiny unpainted areas.
Lifeless Sky
A plain, uniformly colored sky can detract from the overall scene.
Solution: Introduce Cloud Forms and Gradients
Even a clear sky has subtle variations in tone and color. Look for the way the blue deepens towards the zenith or fades near the horizon. If clouds are present, study their structure and how light hits them. Clouds are three-dimensional forms, not flat cutouts. Use soft blending to create smooth gradients and subtle variations in cloud color from white to gray and even hints of pink or orange depending on the light.
Lack of Depth
Drawings can sometimes appear two-dimensional if there is no perceived distance.
Solution: Utilize Atmospheric Perspective and Detail Variation
As mentioned previously, atmospheric perspective is key. Objects further away should be rendered with less detail, lighter tones, and cooler colors (often a slight blueish tint) to simulate the effect of the atmosphere. Conversely, foreground elements should be sharp, detailed, and have stronger contrasts. The size of elements also plays a role; smaller details in the distance naturally suggest further recession.
If you’re looking to enhance your artistic skills beyond just drawing a beach, you might find it interesting to explore how to grow your own habanero peppers indoors. This can be a fun and rewarding project that adds a vibrant touch to your creative space. For more information on this topic, check out this helpful article on growing habanero peppers indoors. Combining art and gardening can inspire new ideas and bring a fresh perspective to your drawings.
Artistic Styles and Interpretations
While this guide focuses on a realistic approach, beach scenes can be rendered in various artistic styles.
Impressionistic Beaches
Impressionist artists often focused on capturing the fleeting effects of light and color.
Capturing Light and Atmosphere
In an impressionistic style, you might use broader brushstrokes and more vibrant, unmixed colors. The focus would be on the overall feeling of the scene and the impression of light on the sand and water, rather than meticulous detail. Consider the dappled light of a sunny day, the way colors blend and shimmer on the water’s surface. This style is less about precise representation and more about evoking a sensory experience.
Stylized and Abstracted Beaches
More abstract interpretations can focus on the essential forms and patterns of the beach.
Emphasizing Shapes and Colors
This approach might involve simplifying forms, exaggerating colors, or focusing on the interplay of lines and shapes. The goal is not to create a photographic likeness but to convey an idea or emotion connected to the beach. Think of reducing the waves to a series of bold curves or the sand to a series of textural marks. The palette might be deliberately limited or enhanced for emotional impact.
The Enduring Appeal of the Beach Scene
The beach has been a subject of artistic fascination for centuries. Its appeal lies in its inherent beauty, its association with relaxation and the vastness of nature. Whether rendered realistically or abstractly, a well-executed beach drawing can transport the viewer to a place of tranquility and wonder. The process of drawing a beach is a journey of observation and translation, an opportunity to capture a piece of the natural world on paper.